

Hello the vCommunity!
As all of you might know by now, vSphere 7 is GA! And I can imagine that many of you have been downloading vSphere 7 to test out all the awesomeness of that new release, and that’s what I’ve done too.
So, I want today to share with you all the different steps in order to properly upgrade from vSphere 6.7 with VCSA to vSphere 7.
Let’s review the prerequisites

First of all: compatibility
We won’t say it enough but you have to make sure that your hardware is supported and compatible with ESXi 7. This can be done here: https://www.vmware.com/resources/compatibility/search.php
Of course, here we are talking about production environment but if you plan to upgrade your homelab, then you can proceed but with caution coz if something goes wrong, you’re on your own as you’re hardware might not be supported.
Please review the release note here before upgrading!
vSphere versions eligible for an upgrade
Below , is the VMware product interoperability matrices that you can find here.


For those running vSphere 6.5 or 6.7, you can directly upgrade to 7.0. However, those running vSphere 6.0 or earlier, you will need to jump first to either vSphere 6.5 or 6.7 depending of the release you currently have in place and finally upgrade to vSphere 7.0.
Please check the upgrade path above to see where you stand.
VMware and other products interoperability
One more important thing is the interoperability with other VMware products but also 3rd party solutions. You can use the same website to make sure that vSphere 7.0 is supported. Regarding 3rd party solutions, check with the editor that everything is supported.
Backup vCenter
Once you’re done with the prerequisites, the next step is to backup your vCenter.
You can either do a backup of vCenter through the VAMI (vCenter Server Appliance Management Interface) backup tool or make a snapshot of the VCSA VM. I’d recommend to do both.
Now that you’re connected to the VAMI, check the overall health of your VCSA. If it’s all green then you’re good to go, otherwise you may need to check what’s wrong with your installation and fix the different issues before moving forward.

You can either schedule a backup or do it right away.

Then choose the backup location and enter the credentials of the backup server. You have also the possibility to encrypt your backup with a password and add the stats, events and tasks too.

As you can see, the process is pretty quick as it didn’t even take a minute to backup my VCSA.

Let’s upgrade vCenter!
Now that you’re all set, let’s upgrade vCenter.
Here’s the link to download vSphere 7: vSphere 7 Download.
In order to upgrade vSphere, you have to start with vCenter first and then proceed with your ESXi hosts. And in a second time, you can update the VMwareTools and the Hardware version of your VMs that we won’t be covering in this article.

Start by mounting the ISO file of vSphere 7 on your computer and run the setup.
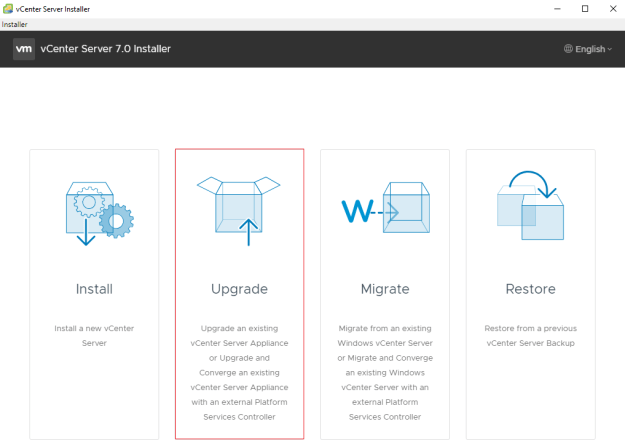
Choose the Upgrade path and then the Introduction window will pop up.
Pay attention to the message at the top, warning you that is you have an external PSC, it will be converged to an embedded PCS with vCenter. Then click Next.
Note: External PSC is deprecated starting vSphere 7.

Accept the end user license agreement and click Next.

Here you have to indicate the FQDN of your current vCenter, the port and click “connect to source” to continue.

Fill in all the required details regarding the source VCSA, SSO credentials and eventually the ESXi hosting the source VCSA then click Next.

Accept the certificate warning and click yes to continue.

Now specify the vCenter target settings. Note that you can either choose to target the ESXi host or the VCSA instance on which the vCenter will be deployed. In my installation, I choose to target my current VCSA.

Accept the certificate warning and click yes to continue.

Enter here the VM name of the vCenter that will be deployed plus the credentials and click Next.

Select the deployment size based on your environment and click Next.

Select the storage location when your vCenter will be installed, enable “Thin Disk Mode” if required and click Next.

Configure here all the network settings or your new VCSA.

Now, you can make a quick review of your settings and if everything’s fine, click finish to start the upgrade and complete Stage 1.

You can follow the current status of your deployment on the screen below.

Once Stage 1 is complete. A successful message pops up and invite you to proceed with Stage 2. You can then either close the Installer and proceed with Stage 2 at a later time through the VAMI or click continue and finish right now the installation. In my case, I choose to continue straight away.

Stage 2
Now that the new vCenter has been deployed in Stage 1, we’re going to copy data from the source VCSA to the fresh deployed vCenter. Click Next to continue.

Some pre-upgrade checks are in progress before going to the next step. Click Next.

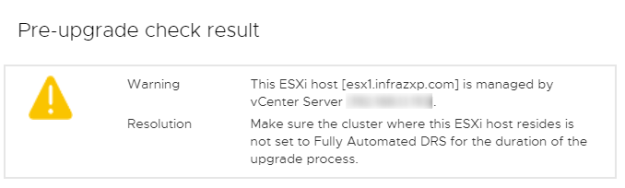
Then appears the pre-upgrade check result that inform you what ESXi host is managed by vCenter. It also warns you to ensure that DRS is not set to Fully Automated during the upgrade process. So you may need to set DRS to manual if needed.
Another warning informs you that some files might not be copied from the source Update Manager during the upgrade. If you’re OK with that click Close and Next.

You can select in this menu the upgrade data you want to copy from the source vCenter. Choose the best option for you and click Next.

Now it’s up to you to accept or not to join the Customer Experience Improvement Program ( CEIP) then click Next.

Now you’re ready to complete Stage 2. You can quickly review the configuration of the wizard and mark the checkbox to confirm that you’ve backed up the source vCenter. Click Finish to launch the upgrade.

The windows below will appeared during the whole data transfer and vCenter setup process.


This message may appear to inform you that vSphere 7.0 disables the TLS 1.0 and 1.1 for improved security. You may need also to reconfigure Auto Deploy after the upgrade.

Congratulation! You’re vCenter Server have now been upgrade to version 7.0

Now you can proudly open the vSphere Client and check the version of your fresh vCenter Server.

ESXi 7 Upgrade
I won’t go through the whole process to upgrade your ESXi hosts as it is pretty straight forward. Again check the compatibility of your hardware.
You can either upgrade your host manually through the GUI in a small deployment, but I’d rather recommend to do it through the vSphere Lifecycle Manager (new VUM) in a production or even testing environnement with a more significant number of hosts. You can also use scripting methods, upgrade with ESXCLI or through vSphere Auto Deploy.
Please follow this link “ESXi Host Upgrade Process” for more details.
Et Voila! Hope my blog post was useful and enjoy vSphere 7.
Hi
We have vCenter 6.7 HA (03 Vms). Does update process is the same?
Hi Martins,
Sorry for the late answer.
VCHA works the same in vSphere 7 as with 6.7.
However, prior to upgrade to vSphere 7, you should remove your VCHA cluster and then you can recreate your VCHA cluster once your vCenter has been sucessfully upgraded.
There is no clear instructions from VMware regarding the state of a VCHA cluster after upgrading to vSphere 7 and expecially for the passive and witness node.
Hope that helps and enjoy vSphere 7.